Installing a Lindby Linbar?
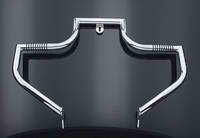
I recently installed a Lindby® LINBAR on my 2009 Sportster. I was certain they had sent a Linbar for a different model because it seemed there was no way this was going to fit on my bike.
I searched for comments from anyone online who had issues with installation, found nothing, which is the inspiration for this tip!
I called the retailer I purchased the bar from and sent it back for replacement. I received the same bar back so I figured it must be correct, and this time installed it without the expectation that it would be an easy ‘bolt-on’.
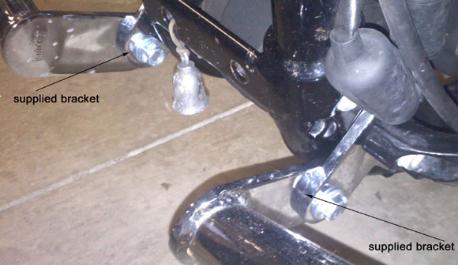
It takes a lot of muscle to get the bolt holes to line up with the brackets that are installed behind the factory forward controls. I expected the crashbar to either straddle the supplied brackets or fit in between, they do not.
One side mounts to the outside and the other side is on the inside (see picture). You need to remove the forward controls (if you have them) and the motor mount bolts. For the top connection, attach and
re-bolt the motor mount with the same bolts, bar in place…do not tighten.
The supplied brackets will mount between the frame and the forward controls – again do not tighten at this point. The bar mount will fit on the inside of the bracket on one side and on the outside of the bracket on the other side.
This is where it gets difficult, you have to force the bar to line up with the newly installed brackets. Once everything is in place you can now tighten to torque specs supplied with the bar.
It is a simple four bolt connection, but as I said requires a lot of muscle. So if anyone has the same mindset – forcing something to fit must not be right – this tip is for you.
Installing a Lindby Crash Bar
Ridersinfo
January 2011